
Setting up a Walmart Seller account can unlock access to 120 million monthly visitors without upfront fees - just a referral fee per sale (6%–15%). Walmart's seller program also offers perks like Walmart Fulfillment Services (WFS), which reduces costs by 15% compared to competitors and boosts sales by 50% on average. Plus, new sellers may save up to $75,000 with Walmart's incentives. Here’s a quick guide to get started:
- Pre-Application Prep: Gather a valid Tax ID (EIN for U.S. sellers), GS1-verified UPCs, proof of address (utility bills or bank statements), and a U.S. warehouse address if handling returns.
- Payment Setup: Choose between Walmart’s Marketplace Wallet or third-party processors like Payoneer. Ensure your business bank account matches the account name.
- Product Compliance: Verify your products meet Walmart’s policies, have valid GTIN/UPCs, and avoid prohibited items.
- Application Process: Submit accurate business details, upload required documents, and electronically sign the Retailer Agreement. Approval typically takes 7–10 business days.
- Account Setup: Configure tax and payment details, upload a company logo, and finalize shipping and fulfillment settings before launching.
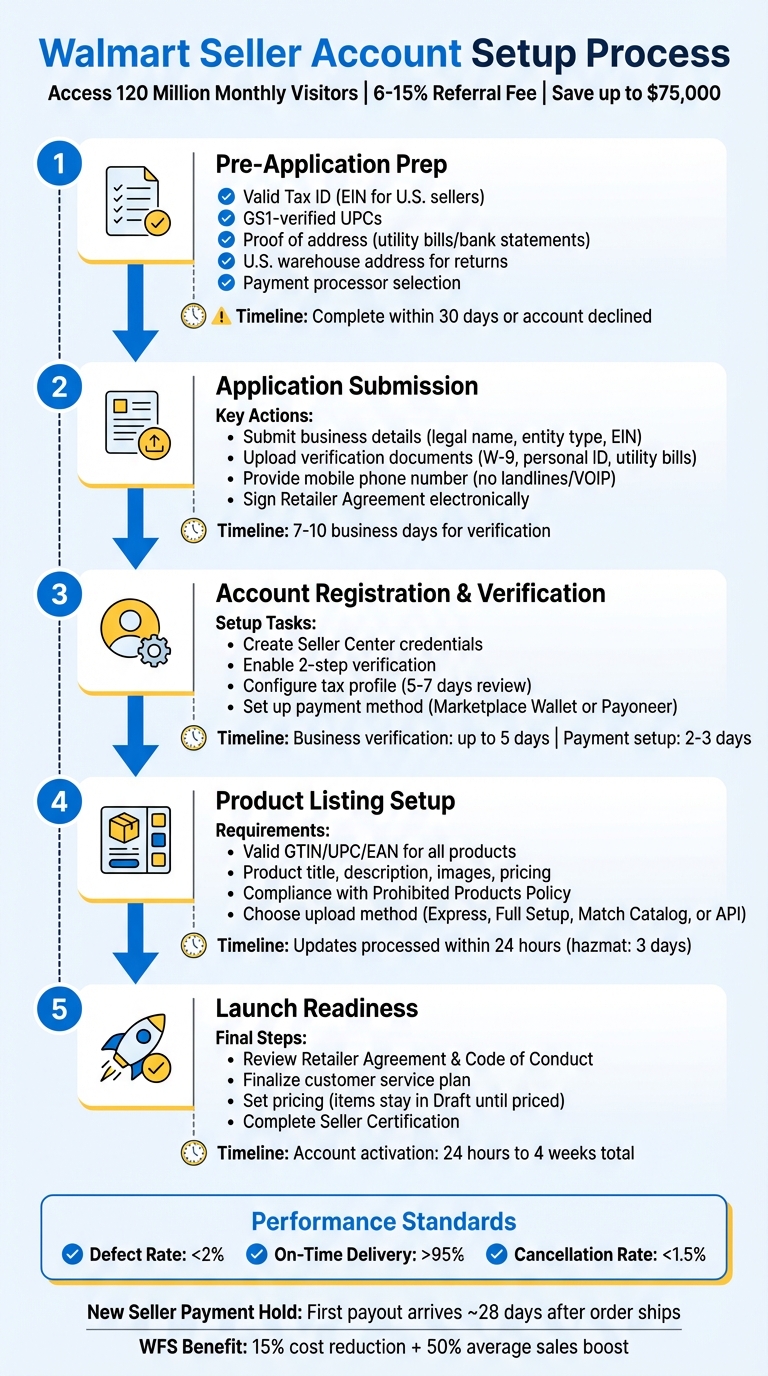
Walmart Seller Account Setup Process: 5-Step Checklist with Timeline
How to Sell on Walmart Marketplace in 2026 | Step-by-Step Guide
Pre-Application Requirements Checklist
Before diving into your application, make sure you have all the necessary documents ready. The business verification process can take anywhere from a few minutes to two business days [4], but missing paperwork will slow things down. Also, keep in mind that you have 30 days to complete the payment setup after submitting your business details. If you miss that deadline, your account will be declined [3]. By organizing everything upfront, you’ll set yourself up for a smoother application process.
Gather Business Documentation
You’ll need to provide a valid Business Tax ID or Business License Number - note that Walmart does not accept Social Security Numbers (SSN) [1][2]. For U.S.-based sellers, this means submitting your Employer Identification Number (EIN) along with a W-9 form. Walmart might also request additional IRS forms, such as CP575, 147c, or CP148B [4]. For international sellers, the required forms depend on your country and business type: W-8ECI, W-8BEN-E, or W-8BEN [4].
To verify your business name and address, you’ll need to submit utility bills or bank statements dated within the last three to six months [2][4]. Additionally, a copy of a personal ID for either the applicant or the business’s legal representative will be required [1][3]. Make sure all the details - like your business name, address, and tax ID - match exactly with your IRS or government-issued documents to avoid validation errors [1][3].
If you plan to handle returns yourself, you’ll need a U.S. warehouse address for that purpose, even if you use seller-fulfilled shipping [2][3]. Keep in mind that certain entities, including non-profits, Hindu Undivided Families (HUF), and most sole proprietorships (except those from India or Mexico), are not eligible to sell on the U.S. Marketplace [1][4].
Prepare Payment and Banking Information
Before applying, decide how you want to receive payouts. U.S. sellers can opt for the Marketplace Wallet, powered by J.P. Morgan. This account is FDIC-insured up to $250,000.00 per depositor through JPMorgan Chase Bank, N.A., and requires a U.S. business bank account registered under the same business name as your Walmart account [5][6][7]. You’ll also need to provide personal details and a government-issued ID for the financial controller who will authorize transactions [5].
"The Marketplace Wallet, powered by our bank provider, is a deposit account embedded in Walmart's platform that allows you to receive and transfer your payouts in Seller Center." – Walmart Marketplace Learn
Alternatively, you can use third-party payment processors like Payoneer, Hyperwallet, or PingPong. If you choose Payoneer, make sure to sign up through the Walmart Seller Center link instead of Payoneer’s website to avoid a $1.50 withdrawal fee [6][7]. Payouts are issued every two weeks, but new sellers should expect a payment hold period, meaning your first payout will arrive about 28 days after an order ships [7].
Ensure Product Readiness
To list your products, you’ll need GS1-verified GTINs or UPCs. If you don’t have these, you can request a UPC/GTIN exemption [1][2][3].
Make sure your items comply with Walmart's Prohibited Products Policy [1][2]. Additionally, you’ll need to demonstrate prior success in marketplace or eCommerce sales as part of the qualification process [1][2]. If you’re planning to use Walmart Fulfillment Services (WFS), gather details like item dimensions, country of origin, and hazardous materials (hazmat) information ahead of time [3].
Once you have your documentation, payment setup, and product data ready, you’ll be well-prepared to submit your application with confidence.
Application Submission Checklist
Once you’ve gathered all the necessary documents, it’s time to fill out your application. The business verification process usually takes 7 to 10 business days [8]. After approval, your account may take at least 24 hours to fully activate, with the entire process ranging from 24 hours to 4 weeks [9][10].
Complete Business Information
Start by entering your legal business name and entity type exactly as they appear on your IRS records. Even small discrepancies, like leaving out "LLC", can cause errors [9][10]. Make sure your Business Tax ID (EIN) matches your business name perfectly. You’ll also need a mobile phone number capable of receiving text messages - landlines and VOIP numbers won’t work for sellers based in the U.S. or China [8].
Using a professional email address (such as one tied to your domain or an Outlook account) instead of a generic Gmail address can help establish credibility. Include links to your existing storefronts on platforms like Amazon, eBay, or Shopify to demonstrate your selling history. Additionally, prepare a simple spreadsheet with product titles, descriptions, images, and pricing to show your business is ready to go [9][10]. Accuracy and attention to detail here can prevent unnecessary delays.
Upload Verification Documents
Submit a color copy of your personal ID (for either the applicant or legal representative) and your W-9 form. You may also need to provide other IRS forms, such as CP575, 147c, or CP148B. For address verification, upload utility bills or bank statements dated within the last three to six months [2][4]. Make sure all documents display consistent information for your business name, address, and tax details.
International sellers should check their specific requirements. For example, Canadian sellers might need a Notice of Assessment or Articles of Incorporation, while Chinese sellers must provide a business license stamped with a company chop. If your business verification is rejected, visit the "business verification tile" in Seller Center and use the "Help" button to contact support and resolve the issue [3]. Once your documents are approved, you’re ready to review and submit your application.
Review and Submit Application
Double-check that your EIN, business name, and address match official records [9][10]. Confirm that all products in your catalog have GS1-verified GTIN or UPC numbers and comply with Walmart’s Prohibited Products Policy. Even one prohibited item in your catalog could result in automatic denial.
After verifying everything, electronically sign the Walmart Retailer Agreement and keep an eye on your email for any follow-up requests. Responding promptly can help avoid delays in the approval process [9]. If your application is denied, you’ll need to wait 14 days before reapplying with updated information [10].
Account Registration and Verification Checklist
Once your account is approved, follow these steps to complete the setup process. Make sure to finish business verification within 5 days, set up your payment method within 30 days, and allow up to 4 hours for inventory updates to reflect [3]. Work through these steps in order to set up your Seller Center credentials, configure payment and tax details, and complete your seller profile.
Set Up Seller Center Credentials
Start by creating your Seller Center login. Update your profile with your name, profile image, and password, and add team members if necessary. You can access My Profile by clicking the gear icon in the upper right corner of the dashboard [12][13]. For added security, enable 2-step verification for all users associated with your account to prevent unauthorized access [3].
Configure Payment and Tax Settings
Navigate to Financial Settings > Tax Profile to input your business name, address, and Tax ID [14]. Walmart will determine your tax classification based on the information provided. For example, U.S. entities will be assigned a W-9, non-U.S. entities with an EIN will receive a W-8ECI, and others will be assigned a W-8BEN-E or W-8BEN [4]. Keep in mind that updates to your tax information usually take 5 to 7 business days for Walmart to review [14]. If your tax profile is denied, you’ll need to contact Support using the "Help" button, as edits cannot be made until the review process is complete [14].
To set up your payout method, go to the "Payment Info" page. U.S. sellers with an IRS tax ID can choose the Marketplace Wallet, or you can opt for third-party providers such as Payoneer, Hyperwallet, or PingPong [5][6][7].
Complete Seller Profile
Choose a display name that aligns with the Marketplace Seller Code of Conduct, upload a 504x504 px company logo in PNG or JPG format, and write a brief company description. Configure your shipping settings by selecting your fulfillment method and providing a verified return address. Be sure to include accurate customer service contact information [3][12]. If you plan to use Walmart Fulfillment Services, add a billing method during onboarding to handle any remaining balances after sales [3].
sbb-itb-81460ea
Product Listing Setup Checklist
Now that your account and payment settings are squared away, it’s time to focus on displaying your products. Before diving in, ensure your business verification, payment setup, and shipping configurations are complete - these are must-haves before you can publish or bulk-upload items [3]. This step comes after you've successfully verified your business and set up your account.
Upload Product Information
Every product needs a valid GTIN, UPC, or EAN. If you sell private-label or handmade items that don’t have these codes, you can request a GTIN exemption through Seller Support by clicking the "Help" button [3][15]. Standard product listings require a title, description, images, and pricing. For items handled through Walmart Fulfillment Services (WFS), you’ll also need to provide extra details such as the country of origin, dimensions, and trade item configuration [3][16].
Once uploaded, you can monitor your product status in the Seller Center Activity Feed. Most updates are processed within 24 hours, though items with hazardous materials may take up to three days for review [15]. If your products aren’t going live, double-check your inventory levels and pricing - these are essential for moving items out of "Draft" status [3]. When updating listings, make sure to include all relevant details to avoid losing existing content [15].
After uploading, confirm that your products align with Walmart's listing standards.
Verify Product Compliance
All products must adhere to Walmart's classification guidelines and comply with the Prohibited Products Policy. Items containing hazardous materials undergo a mandatory compliance review to ensure they meet storage and handling requirements. If you’re using WFS, you’ll need to provide additional compliance data, including the country of origin, precise dimensions, and trade item configuration [16]. Avoid using GIFs or flash images, as these formats are not allowed [15].
For health-related products eligible for FSA/HSA, verify their UPC on the SIG-IS website. Walmart syncs monthly with the Special Interest Group for IIAS Standards (SIG-IS) to ensure UPCs meet federal guidelines, as Walmart does not determine eligibility internally. If your products differ only in attributes like color or size, group them into Variant Groups to display them on a single product page [15].
Choose Upload Method
The best upload method depends on your catalog size and whether your products already exist in Walmart’s catalog. For up to 50 items already listed in Walmart’s system, Express Setup is the quickest option [16]. For larger catalogs of existing products, Match Catalog allows you to handle thousands of items at a time. If you’re adding entirely new products, use the Full Setup template for bulk uploads [16].
| Method | Best For | Description |
|---|---|---|
| Single Item Setup | Individual items | Manually enter details for a single new product not already in the catalog. |
| Express Setup | Small batches (<50) | The fastest way to list items already in Walmart’s catalog. |
| Full Setup (Bulk) | Large catalogs | Use a downloadable template to upload new items in bulk. |
| Match Catalog | Thousands of items | Bulk list items that already exist in Walmart’s catalog. |
| Import Catalog | Multi-channel sellers | Import listings from other marketplaces or Supplier One. |
| API Integration | Technical teams | Ideal for high-volume sellers with technical support. |
"This method [API] is recommended if you're publishing a large catalog of items and have a technical team in place to support your operations." - Walmart Marketplace Learn [16]
There’s no limit to how many items you can add to your catalog [15]. However, keep in mind that item drafts left inactive for 180 days will be automatically deleted by the system [15].
Compliance and Launch Readiness Checklist
Once your account settings are configured, it’s time to ensure compliance and prepare for launch. This step is crucial to keeping your account in good standing and ready to accept orders.
Confirm Policy Adherence
Before activating your account, carefully review the Comprehensive Walmart Marketplace Program Retailer Agreement and the Marketplace Seller Code of Conduct. Make sure your catalog aligns with Walmart’s Product Detail Page Image Guidelines. If you’re using Walmart Fulfillment Services (WFS), double-check that your products comply with the WFS Prohibited Products Policy.
"All Walmart Marketplace sellers are responsible for being aware of and compliant with all policies, rules, and guidelines. Failure to adhere may result in account suspension or termination from the Marketplace program." - Walmart Marketplace Learn
Familiarize yourself with the Seller Performance Standards, which cover key metrics like order cancellations, on-time delivery, and customer feedback. Use the Performance Alarms section in Seller Center to catch and resolve issues early. Additionally, under the Federal INFORM Consumers Act, you must provide accurate business details, including your name, address, and phone number. If your gross revenue exceeds $5,000.00 with 200 or more items sold, you’re required to certify this information annually [8]. Missing this certification could result in account suspension, with reinstatement taking at least 24 hours after submission [8].
Finalize Customer Service Plan
Set up a Customer Care and Seller-Fulfilled Returns Policy that includes a valid U.S. return address. Ensure your customer service email and phone number are active and monitored, as Walmart requires responsive support. Note that landline and VOIP numbers cannot receive one-time passcodes (OTP) for text verification - use a mobile number for this process [8].
Your shipping and fulfillment setup must also be finalized before launch. You’ll need either a U.S.-based B2C warehouse capable of handling returns or enrollment in Walmart Fulfillment Services to meet Walmart’s Shipping and Fulfillment Policy.
Launch Your Account
Once your policies and customer service setup are ready, you can proceed to launch. Keep in mind that items will remain in "Draft" status until you set pricing and complete all setup steps [11]. Be sure to enter your business details and finalize your payment setup within 30 days, as failing to do so will result in account deactivation [11].
Visit the Seller Certification page in Seller Center to review and submit your business information, including customer service contacts and phone verification [8]. Allow 7 to 10 business days for Walmart to verify your updated details, so plan accordingly [8]. New sellers should also prepare for the New Seller Payment Hold period, which helps establish a sales history and build credibility [3][11]. Once all verifications are completed and your products are priced, your account will officially go live and start accepting orders.
Conclusion
Getting your Walmart Seller account up and running requires careful attention to detail. For starters, ensure your legal business name and Tax ID match exactly as they appear on government-issued documents. Any discrepancies can lead to frustrating validation errors [3].
Once you've submitted your application, expect the account activation process to take between 5–10 business days. Here's how it typically breaks down: business verification can take up to 5 days, payment setup verification for Walmart Fulfillment Services billing takes 2–3 days, and inventory updates are usually finalized within 4 hours [3][17][18]. Keep in mind, if you miss the 30-day deadline for completing payment setup, your account will be automatically declined [3].
Staying compliant is key to avoiding account suspension. Walmart has strict performance standards: sellers must keep defect rates under 2%, ensure on-time delivery exceeds 95%, and maintain cancellation rates below 1.5% [18]. Additionally, your products need valid GTIN/UPC GS1 numbers, must align with Walmart's Prohibited Products Policy, and should meet fulfillment requirements through either a U.S.-based warehouse or Walmart Fulfillment Services [1][2]. These guidelines are central to maintaining a successful presence on the platform.
"All Walmart Marketplace sellers are responsible for being aware of and compliant with all policies, rules and guidelines. Failure to adhere may result in account suspension or termination from the Marketplace program." - Walmart Marketplace Learn [1]
FAQs
What are the key advantages of using Walmart Fulfillment Services (WFS)?
Using Walmart Fulfillment Services (WFS) offers several benefits that can help your business grow more effectively. With WFS, you gain access to Walmart’s extensive supply chain network, which ensures quick and dependable shipping for your customers - often within just two days. Plus, WFS takes care of customer support and returns, freeing up your time to focus on other aspects of your business.
Another perk? There are no limits on order size, so whether you’re processing a handful of orders or managing a surge in demand, WFS can handle it. On top of that, your products could qualify for Walmart’s Free Two-Day Delivery tag, giving them more visibility and potentially driving higher sales.
What steps should I take to make sure my products comply with Walmart's requirements?
To get your products approved for Walmart, start by thoroughly reviewing their policies on product listings and restricted items. Double-check that your products meet all legal standards and include precise information, such as GTIN/UPC codes and other mandatory identifiers.
Walmart might also require documentation to confirm your business credentials, so have any necessary paperwork ready. It's a good idea to stay on top of Walmart's guidelines by checking for updates regularly. This helps ensure your listings remain compliant and avoids potential issues with your seller account.
What should I do if my Walmart Seller application is rejected?
If Walmart turns down your seller application, don’t panic - take a moment to review the reasons they provided. Pay close attention to their feedback and ensure your business meets all their eligibility requirements. This includes having the right legal documents, an accurate product catalog, and adhering to Walmart's policies.
Before submitting a new application, go over everything with a fine-tooth comb. Make sure your Partner Profile is complete, all necessary documents - like tax forms and business registration details - are submitted, and you've agreed to Walmart’s terms and conditions. Fix any issues flagged in your initial application to boost your chances of approval.
If you're feeling stuck or unclear about any part of the process, Walmart Partner Support is there to help. Taking the extra time to get everything right can make all the difference when you reapply.
