
If your Shopify store isn’t performing as expected, listing errors might be the culprit. These mistakes - like broken links, pricing issues, or missing product details - can frustrate customers, reduce conversions, and even hurt your search visibility. Worse, platforms like Google Merchant Center may disapprove your listings, cutting off a major traffic source.
Here’s the good news: most of these errors are easy to fix. This guide covers the 10 most frequent Shopify listing mistakes and how to resolve them, including:
- Duplicate product handles causing URL conflicts
- Misformatted or inconsistent product tags
- Missing product images or broken links
- Incorrect pricing or sale badge issues
- Poor product categorization impacting visibility and taxes
Fixing these issues can increase conversion rates, improve search rankings, and boost customer trust. Let’s dive into the details so you can optimize your store quickly and effectively.
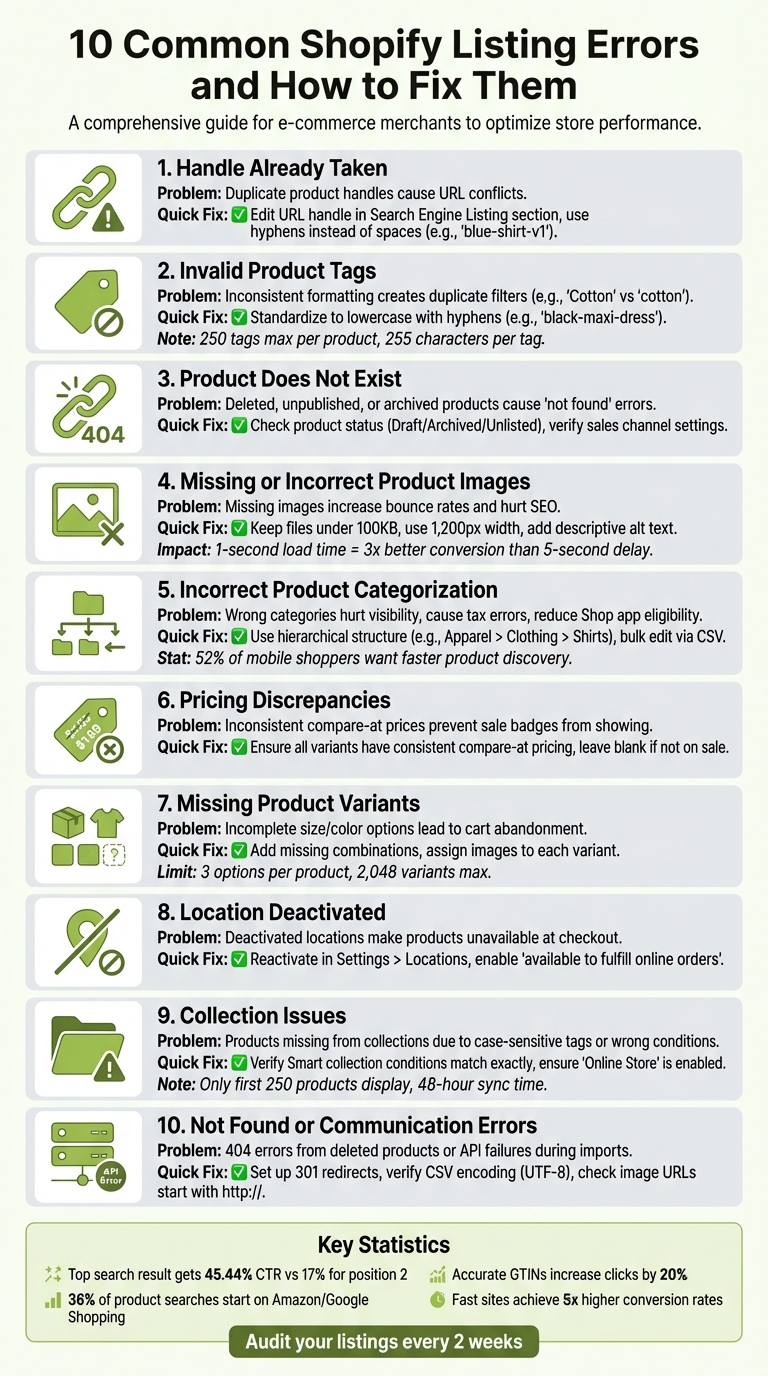
10 Common Shopify Listing Errors and Quick Fixes
How To Fix Product Has Inventory But Shows As Sold Out On Shopify
sbb-itb-81460ea
1. Handle Already Taken
A product handle is what makes your product's URL unique. For instance, in the URL yourstore.com/products/red-t-shirt, the handle is "red-t-shirt." Shopify automatically generates this handle based on your product title when you save a listing [5][6]. Since handles must be one of a kind to ensure each product has its own URL, duplicate handles can create issues. If you upload a CSV file with a handle that matches an existing product, Shopify will either ignore the new data or overwrite the current listing, depending on your import settings. As the Shopify Help Center explains:
The handle is used to uniquely identify each individual product. Make sure you have a unique handle for each product in your CSV [6].
Finding Handle Conflicts
To figure out if a handle conflict is causing issues, go to Products in your Shopify admin and select the product name. Scroll to the Search engine listing section and click the pencil icon to edit. Check the URL handle field - if you notice a suffix like -1 or -2, it means another product is already using the original handle [5]. Also, make sure the handle doesn’t include spaces, as Shopify URLs don’t support them.
When importing products via CSV, it’s a good idea to search for duplicates in the Handle column before uploading. This simple step can help you avoid "Ignored line" errors [6].
If you identify a conflict, you’ll need to adjust the handle as outlined below.
Changing the Handle
Once you’ve found the conflict, update the handle to make it unique. In the Search engine listing section, edit the URL handle field with a new identifier that reflects the product. For example, change suede-shoes to blue-suede-shoes [5]. Use hyphens instead of spaces to separate words, and don’t forget to click Save.
Keep in mind that frequent changes to handles can cause broken links and negatively impact search rankings [5]. As the Shopify Help Center advises:
Don't edit it too often or the product might not display in search engine results [5].
If you’re duplicating products, update the title as soon as possible to prevent handle conflicts [5].
2. Invalid Product Tags
Product tags are essential for organizing your store, but if they're not formatted properly, they can create duplicate filters and confuse your customers. Unlike product categories, which follow Shopify's predefined structure, tags are custom keywords that are more prone to errors [9].
On Shopify's standard plans, you can assign up to 250 tags per product, with each tag allowing up to 255 characters [9]. However, Shopify treats certain special characters - like underscores, ampersands, and percent signs - as equivalent to hyphens. For instance, if you already have a tag labeled sale25, Shopify won't let you save sale25% because it recognizes them as the same [9]. Additionally, tags are case-insensitive: while Cotton and cotton appear as separate options in the admin panel, Shopify processes them as identical [11]. Below, we’ll explore common tagging mistakes and how to fix them.
Common Tagging Mistakes
One of the biggest issues is inconsistent formatting. For example, using both Black and black, or shorthand like blk, creates duplicate filter options, which can confuse shoppers and disorganize your store. Generic tags such as "new", "sale", or "featured" dilute your filtering system and make it harder for customers to find specific products.
Over-tagging can also be a problem. Adding too many tags clutters your system and generates thin content URLs that waste crawl budget. On the flip side, under-tagging limits your store's filtering capabilities, making it harder for customers to narrow down their searches.
Another common issue is using internal shorthand or special characters in tags. For example, tags like f25-v1 or symbols like % are meaningless to customers and may not function correctly in smart collections or search features [9]. As Shopify explains:
Tags aren't used by search engines, so don't use tags to try to improve search results for your online store [9].
Fixing these errors is as important as cleaning up your URLs to optimize your store's performance.
Fixing and Organizing Tags
To avoid tagging issues, start by standardizing your naming conventions. Use lowercase letters with hyphens between words - for example, black-maxi-dress instead of Black Maxi Dress or black_maxi_dress. Stick to basic letters, numbers, and hyphens, and avoid accented characters or symbols to ensure smooth functionality in searches and smart collections [9].
For existing tags, you can clean them up directly in Shopify. Go to the Products section in your admin, select multiple items using checkboxes, and then click Add tags or Remove tags to make bulk updates [11]. For larger-scale changes, export your products to a CSV file, fix any errors in a spreadsheet, and re-import the file with the "Overwrite products with matching handles" option enabled [8].
When creating new tags, focus on descriptive, long-tail keywords rather than generic terms. For instance, instead of tagging a product as dress, use something like black-maxi-dress-for-weddings to attract shoppers with specific needs. Regularly review your tag list to eliminate redundant or unused tags [11].
These steps will make your store's navigation more efficient and user-friendly.
3. Product Does Not Exist
When customers click a product link and encounter a "not found" error, it’s typically because the product was deleted, unpublished, or its URL was changed. Deleted products are gone for good in Shopify and cannot be recovered [5]. The most common reasons include products being set to Draft (not ready for sale), Archived (hidden from the storefront), or Unlisted (only accessible via direct URL) [7].
If a product is marked "Active" in your admin but still doesn’t appear on your storefront, check your sales channel settings and URL redirects [5][12]. Reviewing your products’ statuses and settings can help identify the issue.
Checking Product Status
To check product statuses, go to Products in your Shopify admin and review the status column. If a product is missing, look under the Archived tab - it may have been hidden rather than deleted [5]. For products that show up in the admin but not on the storefront, open the product details page, find the Publishing section, and click Manage to ensure "Online Store" is enabled [5].
Use the Preview tool on the product page to test visibility. If the product shows up in preview but not through a shared link, the issue might be a changed URL handle [5].
If the product is permanently deleted, you’ll need to recreate it.
Recovering Deleted Products
Once a product is deleted, it’s permanently removed from Shopify and cannot be restored [5]. To recreate it, you’ll need to manually click Add product or import it using a saved CSV file [5][8]. For archived products, navigate to the Archived tab, select the product, and click Unarchive product to make it visible again [5].
To avoid losing data during bulk changes, keep a CSV backup of your products [8]. If you need to temporarily hide items, use the Archive function instead of deleting them. This preserves your data and allows for easy recovery [5].
4. Missing or Incorrect Product Images
Product images play a crucial role in both conversion rates and search rankings. When images are missing, it can lead to higher bounce rates and reduced conversions. A delay in page loading, even by a few seconds, can significantly impact these rates [13]. Greg Bernhardt, Senior SEO Strategist at Shopify, highlights this issue:
One of the top contextual signals Google will be looking for on a product page is a product image. It's something the user expects, so if it's not there, it's a bad experience and they'll probably click away [13].
Many issues with missing images stem from errors during CSV imports. For instance, sorting a CSV file can break image links, and using the "Overwrite products with matching handles" option with blank image fields can delete existing images [8]. Additionally, Google Merchant Center may disapprove products if the image_link attribute contains a broken URL [14].
Page load speed is another critical factor. A one-second load time can triple conversion rates compared to a five-second delay [13]. Bernhardt further explains:
The code on the site may resize how the image looks to the user - but it still has to load the gigantic original size, so it'll be slow [13].
Even if images appear smaller on the screen, loading large original files can drag down site performance. Tackling these problems quickly is key to maintaining a smooth user experience.
Finding Image Problems
To spot missing or broken images, check your activity log and product previews regularly [8][5]. Use the Preview button on the product details page to see how images will appear on your storefront before publishing [5].
For products listed in Google Merchant Center, the "Needs attention" tab can help you identify listings flagged for missing or invalid image URLs [14]. Also, avoid using generic file names like "IMG_5545.jpg." Instead, opt for descriptive names like "backyard-fire-pit.jpg" to improve SEO and make files easier to identify [13].
Adding and Optimizing Images
You can upload images individually through Shopify's admin or in bulk using a CSV file [5][8]. Aim to keep file sizes under 100 KB - ideally closer to 70 KB - and use images that are 1,200 pixels wide for a balance between quality and speed [13]. Shopify supports multiple formats, including BMP, GIF, JPEG, PNG, WebP, SVG, and AVIF [13].
To avoid breaking image links, use UTF-8 encoded CSV files and avoid sorting data within them [8]. Always use descriptive file names with hyphens instead of underscores, and add alt text that naturally describes the image, such as "fuzzy pink hat on white background" [15]. Before uploading, compress images with tools like Squoosh or TinyPNG to ensure they load quickly [15].
5. Incorrect Product Categorization
Getting product categories wrong can seriously hurt your store's visibility and usability. When products are misplaced, they become difficult to locate - both for customers browsing your site and through internal search. Items without proper categorization often end up marked as "ineligible" for the Shop app and may fail to sync with external platforms like Facebook or Google [12][10]. This can directly reduce your store's reach and sales potential.
Poor categorization doesn't just affect visibility; it also leads to tax errors. According to the Shopify Help Center:
When a product is categorized correctly, the most accurate tax rate is collected at checkout. Collecting too much or not enough sales tax can create financial or legal liability for your business [10].
Beyond tax issues, incorrect categories disrupt the shopping experience. Shoppers rely on clear filtering options to find what they need quickly. Without proper category metafields, filtering becomes impossible. And since 52% of smartphone shoppers say faster product discovery is a key area for improvement in mobile shopping, this can lead to lost sales [16]. Jacqueline DeMarco from Shopify highlights this issue:
A common mistake is creating overly broad or vague categories that make it difficult for customers to find what they're looking for, leading to frustration and potentially losing them to competitors [16].
Incorrect categorization also impacts SEO. Optimized category pages with relevant keywords and descriptions help boost your store's organic visibility. Misplaced or vague categories, on the other hand, miss out on these opportunities entirely [16].
Checking Current Categories
To start, head to Products in your Shopify admin. Any products without a category will show as "uncategorized" [10]. Use the filter options on the product list page to group items by category, making it easier to identify misplaced products.
Pay extra attention to items imported via CSV files or created through third-party apps, as these often skip categorization. Regularly reviewing your product list can help you catch and fix these issues before they affect your store's functionality or tax compliance. Once you spot errors, update the categories promptly to restore order and improve searchability.
Updating Categories and Collections
For individual products, go to the Products list, click the product name, and locate the Category section. Shopify uses a hierarchical structure, so you may need to drill down through subcategories to find the most accurate match - for example, Apparel & Accessories > Clothing > Shirts [10]. Save your changes once you've selected the right category.
To update multiple products at once, select them in the Products list and use the Bulk edit tool. If the category column isn't visible, click Columns and enable Product category. Then, assign the correct categories to all selected products and save your changes [10]. For larger catalogs, export your product list to a CSV file, update the Product Category column with the correct Category ID or breadcrumb path, and re-import it using the "Overwrite" option [8][10].
It's important to understand the difference between Product Category and Product Type. Product Category (from Shopify's Standard Product Taxonomy) affects tax rates and syncing with sales channels, while Product Type is for your internal organization [10][7]. If a product serves multiple purposes, categorize it based on its primary function - e.g., an alarm clock with a light should be categorized as "Alarm Clock" [10].
For collections, the process varies. To add a product to a manual collection, go to the product's details page, find the Product organization section, and use the Collections field to assign it to the appropriate collections [7]. For smart collections, ensure the product's attributes - like category, tags, or price - match the collection's conditions. The product will then automatically appear in the collection [10][7].
6. Pricing Discrepancies
Accurate pricing is crucial for maintaining customer trust and ensuring smooth store operations. Errors in pricing can immediately raise doubts among shoppers and lead to abandoned carts. Issues like inconsistent sale badges or mismatched prices often result in lost sales. These problems typically arise from variant pricing mismatches, incorrect compare-at prices, and challenges with international pricing.
One common issue is inconsistent "Compare-at" pricing across product variants. For example, if some variants show a compare-at price of $0.00 while others are left blank or have varying values, Shopify may fail to display the product as being on sale on collection pages - even if the discount appears correctly on individual product pages [18]. This happens because Shopify requires all variants to have consistent compare-at prices for sale badges to show up on collection pages.
International pricing introduces its own challenges, often stemming from exchange rates, local taxes, rounding rules, or fixed market-specific prices [17]. When fixed prices are enabled for specific markets, they override the general prices set in your Shopify admin [18]. Additionally, errors in currency formatting - such as displaying the wrong symbol or decimal separator - can make your store look unprofessional and cause customers to leave before completing their purchase.
Finding Pricing Errors
To identify pricing issues, start by reviewing your Shopify admin for discrepancies in the Price and Compare-at price fields. The compare-at price must always be higher than the regular price for sale badges to appear. For products with multiple variants, check each variant to ensure consistent compare-at pricing.
For variants not on sale, leave the compare-at field blank instead of entering $0.00. Shopify treats these two states differently, and using $0.00 can prevent sale badges from appearing [18]. Also, review the Cost per item field - leaving this blank can lead to inaccurate profit and margin reports [7].
If you sell internationally, go to Settings > Markets > [Market Name] > Products and pricing and select View price(s). This will show you how exchange rates and taxes are applied to each product, helping you pinpoint discrepancies [17]. For currency formatting issues, navigate to Settings > General, locate the Store defaults section, click the three dots (...), select Change currency formatting, and update the placeholder {{amount}} to {{amount_with_comma_separator}} to ensure prices display in the standard U.S. format.
Updating Pricing Data
Once you've identified pricing errors, update the Price and Compare-at price fields directly. The Price is what customers pay, while the Compare-at price is the original price shown with a strikethrough. To fix inconsistencies across variants, go to the Variants section and ensure all variants follow the same pricing structure.
| Pricing Field | Purpose | Common Error |
|---|---|---|
| Price | The amount charged to the customer. | Not updated consistently across variants or markets. |
| Compare-at price | The original price shown as a strikethrough. | Inconsistent values across variants. |
| Cost per item | Internal cost for profit tracking. | Left blank, causing inaccurate reports. |
For bulk updates, use Shopify's Bulk Editor or export your products as a CSV file. After updating the pricing fields in the CSV, re-import it using the Overwrite option [7].
If you need to set fixed sale prices for specific international markets, you'll have to import them via a CSV file - Shopify’s admin doesn’t currently support setting fixed sale prices for markets directly [18]. For stores using Shopify's free themes, you can manage how currency codes (like "USD") appear next to prices by going to Online Store > Themes > Customize, navigating to Theme settings > Currency format, and toggling the Show currency codes option [19]. Always preview your storefront to confirm that sale badges display correctly on both collection and product pages, as theme settings can sometimes override admin configurations [18].
7. Missing Product Variants
When product variants are incomplete, customers often feel limited in their choices. If a shopper can't find the size, color, or style they want, they may abandon their cart and look elsewhere. This problem usually stems from rushed product uploads, inventory updates, or simply overlooking all available options when setting up listings.
Shopify allows up to 3 options per product (like Size, Color, and Material) and supports a maximum of 2,048 variants per product [20]. However, sellers sometimes create gaps without realizing it. For instance, a shirt might be listed in Small, Medium, and Large for blue and red but only in Small and Medium for green. These inconsistencies can confuse shoppers and impact your conversion rates.
Adding Missing Variants
To address this, start by checking the product's Variants section in Shopify's admin. Use the Group by feature to quickly identify any missing combinations [21].
If you need to add a new value to an existing option, click Edit next to the option name in the Variants section. Enter the missing value in the Add another value field, then click Done and Save [20]. If you're adding an entirely new option (like "Material" to a product that already has Size and Color), click + Add options like size or color, input the option name and values, and save your changes [20].
For stores with more than 50,000 variants, Shopify limits uploads to 1,000 variants per day unless you're using Shopify Plus [20].
Testing Variant Functionality
Once you've added the missing variants, it's essential to test them on your storefront. Use the Preview button to ensure dropdown menus display the correct options and that selections update images and prices as expected [5].
Keep in mind that each variant can only have one assigned image [20][22]. In the Variants section, click the image icon next to each variant and link it to the appropriate photo from your product media library. Missing images can cause variants to appear as "Ineligible" in the Shop channel, which might prevent them from being visible in search results [12].
Don't forget to set the Price and Inventory for each variant individually. Once variants are added, these fields move from the main product page to each variant's detail page [24]. To save time, use the Bulk edit feature to update prices or inventory for multiple variants at once [23]. Lastly, check the Filter by location setting in the admin to ensure variants aren't hidden due to inventory not being assigned to an active location [21].
8. Location Deactivated
Deactivating inventory locations in Shopify can cause unexpected issues, like making your products unavailable for purchase. When a location is deactivated, it’s removed from your fulfillment system, which might result in "Inventory Unavailable" errors at checkout or even the disappearance of shipping rates.
Sellers often deactivate locations for practical reasons, such as no longer fulfilling orders from a specific site. It’s also a common tactic to stay within the limits of Shopify subscription plans. For instance, the Starter plan supports only 2 active locations, while Basic, Grow, and Advanced plans allow up to 10, and Shopify Plus accommodates up to 200 active locations [25]. Since deactivated locations don’t count toward these limits, some sellers use this as a workaround when they hit their cap. To avoid issues, it’s essential to check the status of your locations and identify any that are deactivated.
Checking Active Locations
To find inactive locations, go to Settings > Locations in your Shopify admin. Use the Location status filter to select "Inactive." Keep in mind that inactive locations won’t appear in admin filters or menus, and you won’t be able to manage or transfer inventory there. Even for active locations, ensure the "Inventory at this location is available to fulfill online orders" setting is switched on. If it’s not, customers won’t be able to buy products stored at that location.
Reactivating or Updating Locations
If you need to reactivate a location, head to Settings > Locations, select the inactive location, and click Activate location (or tap the same option in the mobile app). After reactivating, double-check that the "Inventory at this location is available to fulfill online orders" checkbox is enabled.
Keep in mind that you can’t deactivate a location if it’s currently set as your Default location. To proceed, assign the default status to another active location first. Also, make sure to fulfill or reassign any pending orders or inventory transfers tied to the location before making changes.
For locations using POS Pro, you’ll need to downgrade them to POS Lite before deactivation. If you’re working with dropshipping or third-party fulfillment apps, remember these apps function as locations in Shopify. To "deactivate" them, you’ll need to uninstall the app rather than using the standard deactivation toggle.
9. Collection Issues
Collection issues can disrupt both the customer experience and sales, much like listing errors can harm visibility. Collections are key to organizing your storefront, but problems arise when products go missing or appear in the wrong order. One common pitfall is the case-sensitive nature of automated rules - tags like "Summer" won't match "summer." Make sure your collection settings specify whether products should match all or just any conditions.
Another frequent issue involves availability. Sometimes collections are fully populated in the admin but remain hidden on the storefront. To fix this, go to Products > Collections and confirm that "Online Store" is enabled. Also, ensure collections meet Shop app requirements: at least one approved product with an image and a featured collection image. Keep in mind that only the first 250 products in a collection are displayed, and syncing may take up to 48 hours [28].
Finally, double-check that your collections are properly configured based on whether you're using automated or manual methods.
Verifying Products in Collections
Start by identifying the type of collection you’re working with: Smart (automated) or Manual. For Smart collections, navigate to Products > Collections, select the collection, and review the Conditions section. Ensure that product tags, titles, vendor names, and other attributes exactly match the rules you've set up. For Manual collections, products need to be added individually. Use the "Browse" tool or add them directly from the product's detail page in the Product Organization sidebar.
If you're using sales channels like the Shop app, remember that products must have an image, a price, and a standardized category to display correctly.
Fixing Collection Sorting
Once you've verified product inclusion, the next step is to adjust how products are displayed within a collection. By default, Shopify sorts products alphabetically by title. To change this, go to Products > Collections, select the collection, and use the Sort dropdown in the Products section. Sorting options include Best Selling (based on all-time order volume), Price (highest to lowest or vice versa), Newest/Oldest (by creation date), or Manual, which gives you full control.
If you choose Manual, use the ⠿ icon to drag and reorder products. This option works best for smaller catalogs with fewer than 50 items [26]. For new collections without sales history, the Best Selling option defaults to sorting by newest to oldest [27]. If changes don’t appear immediately, try clearing your cache or waiting a few minutes.
10. Not Found or Communication Errors
Technical problems can be just as disruptive as listing mistakes when it comes to keeping your products visible to customers. Issues like 404 errors or failed API connections can make your products inaccessible. A 404 error happens when the server is running but can’t find the page tied to the requested URL. This often occurs if a product is deleted without a redirect, a product handle is updated without fixing related links, or customers use outdated bookmarks [29].
API and integration errors can be trickier to pinpoint. Problems often arise during third-party app usage or CSV imports due to inaccessible image URLs or missing the "http://" or "https://" prefix. Additionally, stores with over 50,000 variants (except Shopify Plus) face a limit of 1,000 new variants per day via API or CSV [6]. Incorrect CSV encoding can also lead to “illegal quoting” errors or garbled text [6][8].
Identifying Communication Errors
Start by reviewing Google Search Console’s "Coverage" and "Errors" sections to find URLs causing 404 errors [29]. In Shopify admin, confirm the product status is set to "Active" and published on the correct sales channel. For API-related issues, check integration logs for error codes: code 4000002 means a required attribute is missing, and code 90220 indicates incomplete data [30].
If products are visible in your admin but show as "Not Found" on platforms like the Shop app, make sure they have an image, price, and standardized product category [12]. Also, verify that the "Send listing details" toggle in apps like Shopify Marketplace Connect is enabled. If it’s inactive, product titles and descriptions might not sync properly [31].
Fixing Technical Errors
To fix 404 errors caused by deleted products or updated handles, set up 301 redirects in Shopify admin by going to Online Store > Navigation > URL Redirects. This ensures visitors are redirected from the old URL to a new or relevant product page [29].
For CSV import errors like "Unexpected token in JSON", check that your CSV’s column headers exactly match Shopify’s template - headers are case-sensitive (e.g., "Handle" is correct, but "handle" is not) [8]. If you encounter "getaddrinfo" or "download failed" errors, make sure image URLs are publicly accessible and start with "http://" or "https://" [6]. For garbled text issues, open your CSV in a text editor, replace curly quotes with straight quotes, and save the file in UTF-8 format [6]. Persistent API errors with code 4000000 may require retrying the data submission, clearing your cache, or contacting developer support for assistance [30][29].
Conclusion
Making these fixes ensures your Shopify listings function smoothly and work together effectively. Addressing common errors not only boosts your store's visibility but also strengthens your online presence. Every adjustment you make improves how search engines interpret your product data and builds trust with your customers. For instance, the top search result garners an average click-through rate of 45.44%, while the second position drops sharply to 17%[3]. This highlights how even minor improvements in listing quality can dramatically impact your competitive standing.
Regularly maintaining your listings is key to staying ahead. About 36% of product searches start on platforms like Amazon or Google Shopping[1], and retailers who include accurate Global Trade Item Numbers (GTINs) in their product data experience an average 20% increase in clicks[2]. By optimizing your listings, you not only improve your search engine rankings but also enhance user conversions by making your pages clear to search engines and appealing to potential buyers.
Set a schedule to audit your listings every two weeks. Refine product titles, update pricing, and use Shopify's bulk editor to make changes across multiple items quickly. Check Google Search Console weekly for technical issues, and ensure your data remains consistent across all sales channels[2]. Site speed is also critical - fast-loading sites can achieve conversion rates up to five times higher[4], making accuracy and performance essential at every step.
For discontinued products, archive them to avoid high bounce rates. Write unique product descriptions to steer clear of duplicate content problems, and ensure mobile shoppers enjoy the same seamless experience as desktop users. These habits not only improve customer satisfaction but also send strong trust signals to search engines, giving your store a noticeable advantage in an increasingly competitive market. Start refining your listings today to strengthen your position and drive better results.
FAQs
How do I make sure my Shopify product handles are unique?
To keep your Shopify product handles unique, focus on creating clear and specific identifiers for each product. A handle is the part of the product's URL that sets it apart, so duplicates aren't allowed within your store. While Shopify automatically generates handles based on product titles, customizing them can help you avoid conflicts and boost SEO.
If you're importing products through a CSV file, make sure each handle is unique to prevent duplication errors. One way to do this is by checking your current handles before uploading new products. Keeping handles straightforward and consistent not only helps customers and search engines locate your products but also enhances overall navigation and visibility.
Taking time to regularly review and refine your product handles can help keep your store organized and avoid potential hiccups when adding new products.
What’s the best way to organize product tags in Shopify for better navigation?
Setting up product tags properly in Shopify can make a world of difference for both your customers and your store management. When creating tags, aim for simplicity and consistency. Stick to using letters, numbers, and hyphens - steering clear of special characters or symbols that might disrupt search functionality or filtering.
Focus on tags that highlight essential product details, like color, size, or category. These kinds of tags make it easier for shoppers to filter and find exactly what they’re looking for. Plus, maintaining a uniform format across all your products keeps your store organized, especially if you’re managing a large inventory. Smart tagging not only boosts product visibility but also helps you stay on top of your inventory with ease.
How can I resolve pricing differences for my products in different countries on Shopify?
Shopify lets you set specific prices for each region, ensuring your product pricing stays accurate and consistent for customers worldwide. You can manually set fixed prices or handle larger catalogs efficiently using tools like bulk CSV uploads or the Shopify API.
For international markets, enabling local currencies can enhance the shopping experience and potentially increase conversions. Shopify also allows you to customize exchange rates or round prices after currency conversions, helping maintain a uniform pricing structure. These tools give you complete control over your pricing strategy, helping you minimize discrepancies and optimize global sales.
