
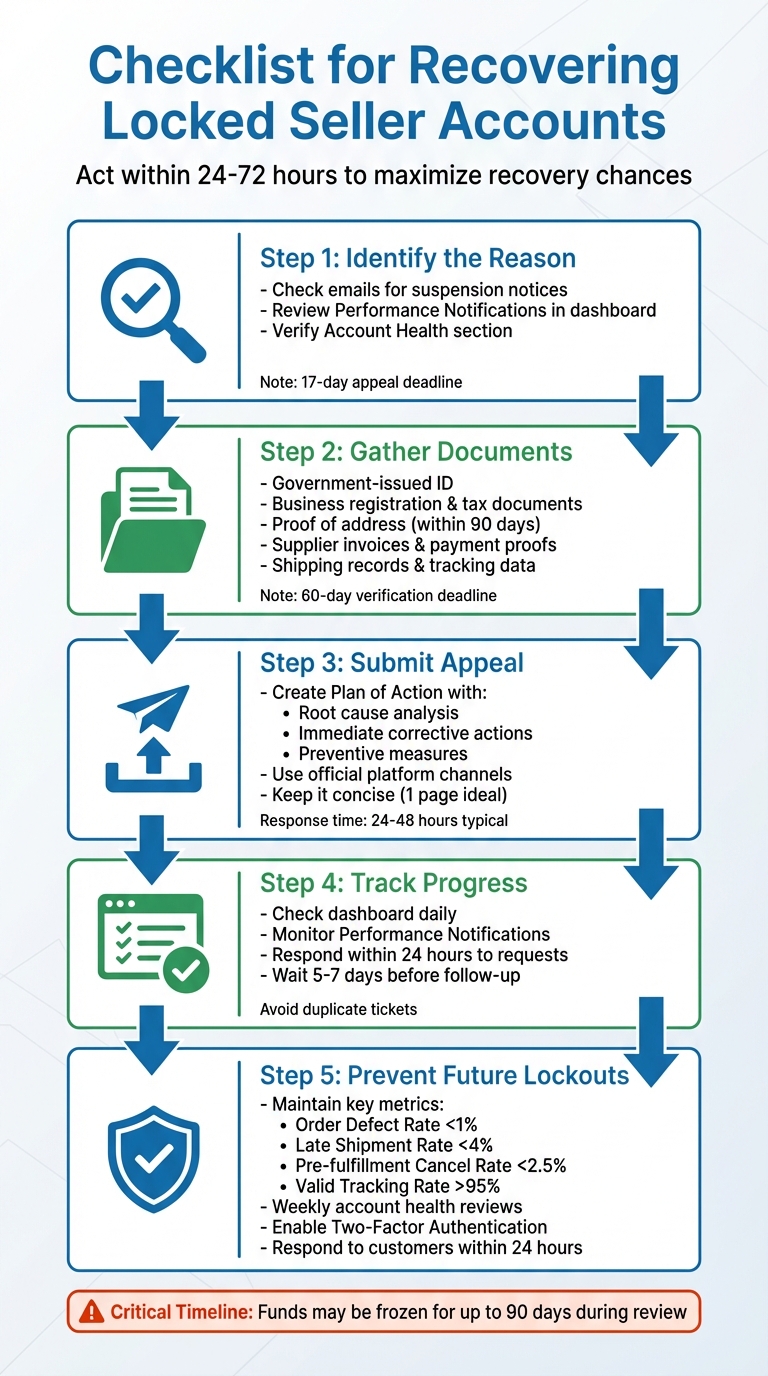
When your seller account on platforms like Amazon or Shopify gets locked, it can disrupt your business entirely. Sales stop, listings vanish, and funds may be frozen for up to 90 days. The first 24–72 hours are critical for resolving the issue. Here's what you need to do:
-
Identify the Reason for the Lockout
- Check emails and notifications for suspension details.
- Verify the issue in your account dashboard (e.g., Amazon's Account Health section).
-
Gather Required Documents
- Government-issued ID, business registration, and proof of address.
- Supplier invoices, payment proofs, and shipping records for product verification.
-
Submit an Appeal
- For Amazon: Create a Plan of Action addressing the root cause, immediate fixes, and preventive measures.
- For Shopify: Submit required documents via the Help > Contact Support section.
-
Track Appeal Progress
- Monitor updates in your dashboard and respond promptly to additional requests. Avoid creating duplicate tickets.
-
Prevent Future Lockouts
- Maintain key performance metrics (e.g., Order Defect Rate under 1%).
- Regularly monitor account health and ensure compliance with platform policies.
Act quickly, stay calm, and follow these steps to recover your account and safeguard your business.
5-Step Process to Recover a Locked Seller Account
How to Recover and Secure an Amazon Seller Central Account | Learn from 417k Amazon Seller Reviews

sbb-itb-81460ea
Step 1: Find Out Why Your Account Was Locked
The first step in addressing a locked account is figuring out what caused the issue. Platforms like Amazon and Shopify usually send notifications explaining the lockout, and missing these alerts can delay your response - especially during the critical first 72 hours.
Check Your Emails and Notifications
Search your inbox for terms like "account suspension", "Business Solutions Agreement violations", or "Section 3" notices. These emails typically outline the reason for your lockout and may include instructions to resolve it. Before clicking on any links, always verify the email through your platform's dashboard to avoid phishing scams.
"Official notifications live inside Seller Central. Amazon's official messages about account reviews, required documents, and appeal channels appear in Performance Notifications (not only via email)." – Break Thirty [8]
For Amazon sellers, the Performance Notifications section in Seller Central is your most reliable source. Navigate to Performance > Performance Notifications to find the official suspension or deactivation letter. This document will specify which policy you violated - common issues include an Order Defect Rate exceeding 1%, a Late Shipment Rate over 4%, or concerns about product authenticity. Keep in mind that you have a 17-day deadline to submit an appeal once you receive this notice.
If you're locked out of Shopify due to two-factor authentication problems, check your email for recovery codes or locate the shopify_recovery_codes.txt file you saved during setup. Error messages like "Invalid Charge Method" or "2SV failed" can also point to the root of the problem.
Once you've reviewed your notifications, log in to your dashboard to confirm the details.
Review Your Account Dashboard
After checking your emails, head to your account dashboard for additional information. On Amazon, look for a "limited access" banner at the top of your Seller Central homepage or a zero rating in the Account Health section under Performance > Account Health. This section provides your Account Health Rating and highlights specific policy violations or metric failures that led to the lockout.
You should also check your Payments Statement for any held funds or reserves, which could indicate an investigation. For Walmart sellers, the Seller Scorecard in the Seller Center is where you'll find details about drops in On-Time Delivery or spikes in Order Defect Rates.
Lastly, export your order history, performance metrics, and case logs as soon as you notice a lockout banner. These records might become inaccessible later in the review process, and you'll need them to build a strong appeal.
Step 2: Gather Required Documents
Once you've figured out why you're locked out, the next step is to collect the documents needed for both identity and business verification. Time is of the essence here - Amazon usually gives sellers a 60-day deadline to complete verification before freezing disbursements and removing listings [10]. Most platforms require documents issued within the past 90 days [9], and while verification typically takes 24–48 hours, more complicated cases can stretch to five business days or longer [9].
Collect Identity and Business Verification Documents
Start with a government-issued photo ID - this could be a passport, driver's license, or national ID. Make sure it's current and upload a high-resolution, full-page scan of both sides. Avoid blurry photos, cropped images, or screenshots; these will likely fail automated checks.
For business verification, gather documents like your business registration certificate, trade license, or certificate of formation, along with tax-related documents such as your EIN (Employer Identification Number), VAT, or TIN. If you're in the EU or UK, you'll need to disclose any individual or company owning 10% or more of the business, while other regions may only require disclosures for those with 25% or more ownership [10]. If your business structure is complex, prepare an organizational chart signed and dated within the last 180 days. This chart must list all Ultimate Beneficial Owners (UBOs) and may require a physical signature or company stamp.
You'll also need proof of address, such as a utility bill, bank statement, lease agreement, or property tax receipt. Ensure this document clearly shows your legal business or residential address. Importantly, the name, address, and business details on all documents must match your platform account settings exactly - even small differences like "Ltd." vs. "Limited" or misplaced punctuation can lead to rejections [9].
"Ensure the information on your ID, utility bill, and Seller Central form is identical, including spacing, abbreviations, and capitalization." – Ecomclips [9]
If you're dealing with authenticity or policy violations, be ready to provide manufacturer or distributor invoices, payment remittances, and carrier receipts to verify your supply chain. For brand-related issues, include trademark registration certificates and Brand Authorization Letters. Depending on your product category, you might also need compliance documents like FDA or CE certificates.
Alongside these, you'll need to gather records showing your recent transaction history.
Prepare Transaction and Activity Records
Compile sales data, payment histories, and customer communication logs from the past 12 months. Your invoices should cover at least as many units as you've sold, accounting for returns and cancellations [13]. For example, if you've sold 1,000 units but only have invoices for 800, address the discrepancy upfront in your appeal.
Do not redact or alter invoices - platforms often view redactions as suspicious [13]. Each invoice should include supplier contact details, matching business information, and product identifiers like UPC, EAN, or ISBN [13]. Pair each invoice with proof of payment, such as bank or credit card statements.
"The most important element is proof of payment. If your invoice doesn't show that payment was actually made, Amazon will treat it as a purchase order, not an invoice, and it will not meet their requirements." – CJ Rosenbaum, Attorney, AmazonSellersLawyer.com [13]
To further validate your transactions, include shipping labels, carrier receipts, bills of lading, and tracking data [12][13][4]. If an invoice lists multiple products, submit two copies: one clean and another with the relevant items highlighted for the reviewer [13]. Always use PDF format - it's the standard for seller verification systems [11]. Whenever possible, download original digital PDF statements directly from your bank or utility provider to ensure the text is machine-readable and meets verification standards.
Step 3: Submit Your Appeal
Once you've gathered all the necessary documents (as outlined in Step 2), it's time to submit your appeal. Make sure to use the appropriate submission process for the platform you're dealing with. Below, you'll find specific instructions for submitting appeals on Shopify and Amazon.
How to Appeal a Shopify Account Lockout

To appeal a Shopify account lockout, log in to your Shopify Admin dashboard and navigate to Help > Contact Support, then select "Shopify Payments." When submitting your appeal, attach the following documents in a single message:
- Government-issued ID
- Business registration paperwork
- Supplier invoices
- Shipping tracking information
- Bank statements
In your message, be sure to include the following details:
- Your store name and the date of suspension
- A brief explanation of your business model
- A reference to the evidence you've attached
- Steps you've already taken to address the issue
Keep your tone professional and stick to the facts. If your suspension is permanent, be aware that Shopify may hold your funds for 90 to 180 days to cover potential chargebacks.
"Shopify Payments suspension is serious but frequently reversible with adequate documentation and cooperation." – Codefy
How to Appeal an Amazon Account Suspension
For Amazon, a well-structured Plan of Action (POA) is critical to a successful appeal. Start by signing in to your Seller Central account, then go to Performance > Account Health and click the "Appeal" button next to your suspension notice.
Your POA should be divided into three clear sections:
- Root Cause Analysis: Identify and explain the issue that led to the suspension.
- Immediate Corrective Actions: Outline the steps you've already taken to resolve the problem.
- Preventive Measures: Detail your long-term strategies to ensure the issue won’t happen again.
Use bullet points to make your POA easy for reviewers to scan. Keep it concise - one page is ideal - and focus solely on the issues mentioned in the suspension notice. Take responsibility for the problem and maintain a factual tone throughout.
"Amazon's objective is risk prevention. Unless your appeal removes this risk in their eyes, reinstatement will not be possible." – eCom Managers
Amazon typically responds to appeals within 24 to 48 hours, though complex cases may take longer. If your metrics are problematic - such as an Order Defect Rate above 1%, a Late Shipment Rate exceeding 4%, or a Pre-Fulfillment Cancel Rate over 2.5% - your POA must clearly demonstrate how these issues have been resolved. Include supporting documents like supplier invoices, shipping receipts, or internal audit reports to strengthen your case.
Step 4: Track Your Appeal and Respond to Requests
Once you've submitted your appeal, staying on top of its progress is crucial. Regularly monitor updates and respond quickly to any requests from the platform's support team. This step can significantly impact the success of your account recovery.
Check Your Appeal Status
If you're an Amazon seller, make it a habit to check your Seller Central dashboard daily. Navigate to Performance > Account Health or Performance > Performance Notifications for updates. Also, keep an eye on your registered email inbox for any correspondence from Amazon [16][12][2].
For cases requiring more information, you'll find a "View Appeal" button in the Account Health section. Use it to submit any additional documents Amazon requests [15]. While Amazon typically responds to initial appeals within 24 to 72 hours, more complex cases might take 1 to 3 weeks or, in some instances, as long as 4 to 5 weeks [2][12][16].
If you're a Shopify user, ensure you're consistently checking both your email and the Admin dashboard under Help > Contact Support for updates.
One common pitfall to avoid is sending repeated follow-up emails or opening new support cases while waiting for a response. Doing so can delay the process.
"Every time you open a new case or reply to the original one, you risk bumping your appeal to the very back of the line. It's like resetting the clock on your review time." – Chilat Doina, Million Dollar Sellers [17]
If you haven't heard back, wait at least 5 to 7 business days before following up [12]. For cases stuck beyond 10 to 14 days without a reply, consider escalating to executive relations. However, use this option sparingly [17].
Once you've confirmed the status of your appeal, be ready to address any requests for additional information promptly.
Reply Quickly to Support Requests
When the platform's support team asks for more details, respond immediately through the official channels. For Amazon, always use the "View Appeal" button in your dashboard rather than creating new email threads. This ensures your case stays organized and prevents duplicate tickets, which can slow down the process [15].
To streamline your responses, keep a digital library of essential documents like supplier invoices, authorization letters, and shipping records. Save these as PDFs or JPGs with clear file names, such as Invoice_ASIN_SupplierName_Date.pdf, to help reviewers process them more efficiently [17][12].
During a suspension, Amazon may freeze your funds for up to 90 days. Responding promptly can help speed up both account reinstatement and fund recovery [15]. Additionally, double-check your emergency contact settings to ensure you don't miss any urgent communication. Occasionally, Amazon may even call sellers to assist during the appeal process [15].
If your appeal is rejected, resist the urge to resubmit the same Plan of Action with minimal changes. Platforms often interpret this as a lack of understanding, which can lead to communication breakdowns with the support team [18][19]. Instead, carefully analyze the rejection notice for specific terms like "inauthentic" or "infringement" to identify exactly what needs to be addressed [17][2].
Step 5: Prevent Future Account Lockouts
Getting your account reinstated is just the first step. To avoid future lockouts, it's essential to put preventive measures in place. Platforms like Amazon and Shopify rely heavily on automated systems that react to data, metrics, and complaints without human oversight.
"Amazon's system isn't designed to debate intent. It reacts to data, metrics, and complaints, often automatically" – Bhoomi Singh, Sumtracker [14]
Follow Platform Policies
Sticking to platform rules is non-negotiable if you want to keep your account in good standing. Key metrics to monitor include Order Defect Rate (ODR) under 1%, Late Shipment Rate below 4%, Pre-fulfillment Cancel Rate under 2.5%, and Valid Tracking Rate above 95%. These metrics are critical for maintaining buyer trust [7][24].
To avoid disputes over product authenticity, always keep detailed, itemized invoices from authorized suppliers. Digital copies of these documents should be easily accessible in case they're needed. This is particularly important as some competitors may use bad-faith intellectual property claims to target your listings [7].
Respond to customer messages within 24 hours to minimize negative feedback and reduce the risk of A-to-Z claims [24]. Use official platform tools for discounts, refunds, and communication to stay compliant. Also, remember that most platforms enforce a strict "one account per seller" rule. Sharing IP addresses, credit cards, or tax IDs between accounts can result in linked account bans [14].
Once your policies are solid, regular monitoring becomes your next safeguard.
Check Your Account Regularly
Policy compliance alone isn't enough - you need to actively monitor your account. Routine checks, whether daily or weekly, can help you catch potential issues before they escalate. Platforms like Amazon are increasingly using AI-driven monitoring, making it even more important to stay vigilant [5].
Make it a habit to review your Account Health Dashboard and Performance Notifications weekly. In about half of all cases, Amazon provides warnings before suspensions, giving you a chance to resolve issues early [20]. Quarterly audits of your active listings can also help ensure they comply with updated terms of service and restricted product lists [3].
Set up alerts for unusual activity, such as multiple failed login attempts, unexpected transaction spikes, or large purchases from unknown IP addresses [22]. Regularly checking your bank and credit card statements for unauthorized "test" transactions can help you catch fraud attempts early [23]. For added security, enable Two-Factor Authentication (2FA) and use strong, unique passwords [6].
Keep your team informed by regularly updating virtual assistants and brand managers on compliance changes and standard operating procedures [24]. Using platform-specific fulfillment services like FBA can also help you meet shipping and delivery standards automatically [20]. These proactive steps can protect your business from major disruptions, especially when the average cost of a data breach has climbed to $4.45 million as of 2023 [21].
Conclusion
Getting a locked seller account reinstated requires quick and well-thought-out action. Start by determining why your account was locked - check your email notifications and account dashboard for clues. Then, gather all the necessary documents before submitting your appeal.
Your Plan of Action should clearly outline three key elements: the root cause of the issue, the steps you’ve taken to fix it, and the strategies you’ll use to prevent it from happening again. Keep your appeal straightforward and factual to meet the expectations of the review team.
"A suspension isn't the end unless you treat it like one. Sellers who slow down, understand the issue properly, and respond with a clear Plan of Action consistently have better outcomes than those who panic." – Bhoomi Singh, Sumtracker [2]
Be aware that first appeals often don’t succeed. Many sellers need to revise and resubmit their plans based on reviewer feedback. Acting quickly is essential to avoid permanent account closure [1]. Once reinstated, focus on maintaining strong account health by keeping your Order Defect Rate below 1%, Late Shipment Rate under 4%, and responding to customer inquiries within 24 hours. This disciplined approach not only helps you recover but also minimizes the chances of future issues.
FAQs
What’s the fastest way to figure out why my seller account was locked?
If you're locked out of your account, start by checking notifications or emails from the platform. These often provide details about the issue, such as potential policy violations or security concerns. Next, log in to your Seller Central account and look for banners or messages that might explain the problem. If you're unable to access your account, try resetting your password or updating your two-step verification settings to gather more information about the lockout.
What documents are most often rejected during seller verifications?
Documents often get rejected for reasons like low resolution, being outdated, or containing inconsistent information. Common examples include expired identification cards, poorly scanned copies, mismatched details between documents, or non-English documents lacking certified translations. To prevent issues, double-check that all submitted materials are clear, current, and consistent across the board.
What should I do if my appeal gets denied the first time?
If your appeal is denied, take a close look at the suspension notice to pinpoint the exact issue. Craft a detailed Plan of Action (POA) that explains how you’ve addressed the problem, the immediate steps you’ve taken to fix it, and how you’ll prevent it from happening again. Make sure to include any supporting documents that prove the issue is resolved. If repeated appeals don’t work, it might be time to reach out to an account reinstatement specialist for expert advice tailored to your situation.
