
When updating your Shopify theme, your custom code - like CSS tweaks, Liquid modifications, or tracking scripts - can be overwritten. This can break your store’s layout, navigation, or functionality. To avoid this, follow these steps:
-
Back Up Your Theme:
- Duplicate your theme in Shopify to create a safety net.
- Download theme files for offline storage.
-
Locate Custom Code:
- Use Shopify's code editor to find edited files.
- Add clear comments (e.g.,
/* Custom code start */) to mark your changes.
-
Organize Custom Code:
- Save custom CSS/JS in separate files.
- Use snippets for reusable Liquid or HTML code.
-
Transfer Customizations:
- Install the updated theme as a new version.
- Copy custom code from the old theme carefully, starting with settings and templates.
-
Test Before Publishing:
- Preview the updated theme and check for any issues.
- Ensure customizations work with the new theme structure.
-
Use Built-In Theme Settings:
- For minor tweaks, use Shopify’s Custom CSS and Liquid fields, which are preserved during updates.
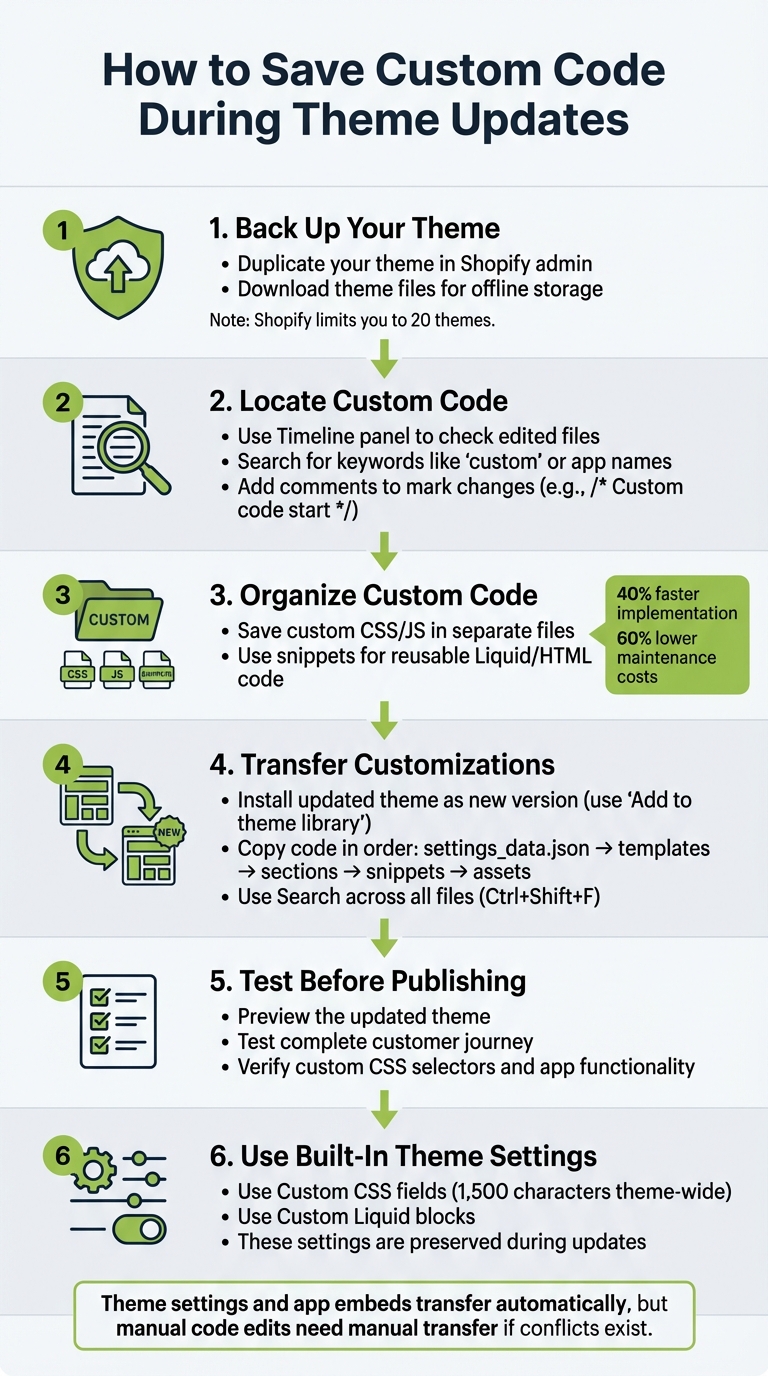
6-Step Process to Save Custom Code During Shopify Theme Updates
How to Edit Shopify Code So It’s Easy to Update Your Theme Later

Step 1: Back Up Your Current Theme
Before diving into any changes, it's essential to back up your theme. Shopify doesn’t automatically handle this for you, so it’s up to you to create a manual backup. This precaution ensures that if anything goes wrong during the update, you can easily restore your theme without losing your customizations[7].
Duplicate Your Theme
The quickest way to back up your theme is by duplicating it directly in Shopify. Here’s how:
- Go to Online Store > Themes in your Shopify admin.
- Click the Actions button next to your active theme.
- Select Duplicate[4][6].
Shopify will create a copy labeled "Copy Of [Your Theme Name]" and store it in your admin panel. This duplicate acts as a safety net, allowing you to revert to the original version if needed. Just remember, Shopify limits you to 20 themes in your admin[4]. If you’ve maxed out this limit, you’ll need to download an unused theme and delete it to make room.
Download Your Theme Files
For added security, create an offline backup by downloading your theme files. From the same Actions menu, choose Download theme file. Shopify will send a ZIP file containing all your theme code - such as Liquid, CSS, and JavaScript files - to the email address linked to your staff account[5][7].
Store this ZIP file in a secure location. Once your theme is backed up both online and offline, you’re ready to move on to preserving your custom code.
Step 2: Find Custom Code in Your Theme
After backing up your theme, the next step is pinpointing all custom code. Shopify's code editor offers tools to make this process more manageable.
Check for Edited File Markers
Shopify makes it easy to spot changes in theme files. When you open a Liquid file in the code editor, look at the Timeline panel in the bottom right corner. If the file has been modified, the Timeline will show previous versions with timestamps. This feature lets you compare the current version to earlier ones, making it clear what changes were made and when.
You can also use the global search tool (the magnifying glass icon) to search for keywords like "custom" or app names across your theme. To narrow down results, right-click on specific folders - like "Sections" or "Snippets" - and select Find in folder.... Once you've identified customizations, marking them clearly will help ensure safe updates later.
Add Comments to Mark Custom Code
To safeguard your custom code during updates, label it with comments. For instance, wrap your custom CSS, JavaScript, or Liquid code with clear tags like this:
/* Custom code start - Added 02/10/2026 */
Your code here
/* Custom code end */
For Liquid files, use the appropriate comment syntax. These comments make it easier to locate and understand your customizations in the future, providing context for both you and anyone else working on your theme.
Step 3: Store Custom Code in Separate Files
Once you've backed up your theme and pinpointed your custom code, the next step is to store those customizations in separate files. Why? Because editing main theme files like theme.css or theme.js directly can lead to your changes being wiped out during updates. Keeping your custom code in its own files ensures that your work remains intact and distinct from the original theme code.
Shopify Growth Services highlights the benefits of this approach: stores that use upgrade-friendly customizations experience 40% faster implementation times for new features and 60% lower maintenance costs over three years. A typical theme update requiring 40–80 hours of developer time can shrink to just 2–6 hours with this method [3].
Create Dedicated Files for Custom CSS and JS
To keep your customizations organized, create new CSS and JavaScript files in the Assets folder. Use the New file option and name your files with only letters, numbers, dashes, or underscores - avoid spaces. Examples of good file names include custom-styles.css or custom-scripts.js.
After creating the files, link them to your theme's main layout file (usually theme.liquid). Add this Liquid tag in the <head> section for CSS:
{{ 'custom-styles.css' | asset_url | stylesheet_tag }}
For JavaScript, place this tag just before the closing </body> tag:
<script src="{{ 'custom-scripts.js' | asset_url }}" defer></script>
"Definitely use custom files so that your work doesn't get overwritten if you ever update the theme."
- JoesIdeas, Shopify Community Power User [8].
For improved performance, only load these files when necessary. Use Liquid conditionals to target specific pages. For example, if you have styles specific to product pages, wrap the CSS link in an {% if template == 'product' %} ... {% endif %} block to prevent unnecessary loading on other pages.
Save Reusable Code as Snippets
If you find yourself reusing the same Liquid or HTML code in multiple places, save it as a snippet. Create a new .liquid file in the Snippets folder with a clear, descriptive name like product-card.liquid or promo-banner.liquid. Then, include it in your templates using:
{% render 'snippet-name' %}
Using snippets not only keeps your templates clean but also simplifies updates. As Keir Whitaker notes in the Shopify Partner Blog:
"Snippets are extremely useful and allow you to keep repeated code in a single file. Above all, this has the benefit of enabling us to update all instances of that code from one file" [9].
sbb-itb-81460ea
Step 4: Transfer Custom Code to the Updated Theme
Now that your custom code is organized from Step 3, it’s time to move it to the updated theme. Here’s how to ensure a smooth transition while keeping your customizations intact.
Install the Updated Theme
When Shopify notifies you about a theme update, always choose "Add to theme library" instead of overwriting your current theme. This action adds the updated version to your library as an unpublished theme, leaving your live site untouched during the process.
Shopify may automatically include your code edits if they don’t conflict with the update. Check the theme card for a status message - it will either say "code edits successfully included" or "code edits could not be included." While your theme settings, page layouts, and app embeds are usually transferred automatically, manual edits in the Templates folder and the settings_data.json file will need your attention.
"Adding a new theme to your theme library doesn't impact your current theme or any other themes in the library." - Shopify Help Center [2]
Once the updated theme is in your library, you can begin transferring your custom code.
Copy Custom Code to the New Theme
Open both the current and updated themes in separate browser tabs or windows for easy comparison. Start with the settings_data.json file to transfer configuration settings. Remove any references to custom blocks or outdated settings that the new theme might not support.
Follow this order when transferring your customizations: settings_data.json, custom templates, sections, snippets, and finally, custom asset files. To speed up the process, use the Search across all files feature (Ctrl+Shift+F on Windows or Cmd+Shift+F on Mac) in Shopify’s code editor to locate specific CSS classes or JavaScript functions that need to be copied.
As you paste code, Shopify’s Theme Check feature will flag issues like missing templates or scripts that might cause problems. If you encounter errors after copying a file, use the Timeline view in the code editor to roll back that file to a previous state.
Once all customizations are transferred, it’s time to ensure everything works seamlessly.
Test Before Publishing
Before publishing the updated theme, use the theme preview feature to thoroughly test it without affecting your live store. Go through the entire customer journey - from the homepage to product pages, adding items to the cart, and completing the checkout process.
"Test the complete checkout experience from landing on the homepage, viewing and adding products, all the way to checking out." - Shopify Professional Services [10]
Make sure your custom CSS selectors align with the updated theme’s HTML structure, as class names may have changed. Also, check that all installed apps function properly with the new theme setup. Only after confirming that everything works as intended should you publish the updated theme to replace the live version.
Step 5: Use Theme Settings for Simple Changes
When it comes to small design tweaks, using your theme's built-in settings is a safer and easier option compared to diving into custom code. These settings not only reduce the risk of errors but also make future updates more seamless. Shopify's Theme Editor offers dedicated fields for CSS and Liquid, which are preserved during updates - unlike direct file edits that can get overwritten.
Add Code to Custom CSS and Liquid Fields
To access these customization options, head to your Shopify admin and navigate to Online Store > Themes > Customize. Once there, go to Theme settings > Custom CSS to apply styling changes. This method ensures your customizations remain separate from the core theme code, simplifying updates.
You can add CSS in two ways: theme-wide or section-specific. Use theme-wide CSS (up to 1,500 characters) for global changes across your site, and section-specific CSS (up to 500 characters) for more focused adjustments [11][12].
"Moving forward, using theme blocks, Custom Liquid blocks, or the theme's Custom CSS functionality instead of direct file edits will make your themes much more update-friendly since these elements are preserved during upgrades."
- KyleG-Shopify, Shopify Staff [13]
However, keep in mind that there are some limitations with custom CSS fields. For example, you cannot use @import, @charset, or @namespace at-rules, and the content property is not supported [11]. Additionally, only URLs from the https://cdn.shopify.com domain are allowed in these fields [11]. While these settings generally survive updates, your CSS might stop working if a theme update alters the HTML class names or IDs you're targeting [11][12].
Conclusion
Updating your Shopify theme doesn’t mean losing your custom work. The secret lies in preparation, organization, and thorough testing. Start by duplicating your theme and downloading a local backup. This step is critical because once files are lost, they can’t be recovered. A solid backup plan ensures your custom code is safe during updates.
"Theme updates can and often do wipe out custom code, and most advice online won't actually help you if you're not a developer."
To streamline the process, keep your custom code neatly organized in separate files or snippets. This approach makes it easier to identify what needs to be moved over after an update and helps avoid potential conflicts.
After transferring your custom code, thorough testing is a must. Double-check that your custom CSS selectors are still targeting the correct elements and verify that your conversion paths are functioning as intended.
It’s worth noting that Shopify will automatically carry over theme settings and app embeds during updates. However, manual code edits will only be included if they don’t conflict with the new version [2]. For conflicting edits, you’ll need to transfer them manually, which is why having backups and clear documentation is essential.
FAQs
Which theme files are most likely to lose my edits?
When working with Liquid, HTML, CSS, JSON, and JavaScript files, custom edits are particularly vulnerable during theme updates. Updates can overwrite these files, especially if your changes clash with the new version of the theme. To protect your work, always create backups of these files before proceeding with an update. This simple step can save you from losing your customizations.
What’s the safest way to move code to an updated theme?
To safely transfer custom code to an updated theme, start by duplicating your theme to create a backup. This ensures you have a fallback in case anything goes wrong. Next, externalize your custom code snippets - store them separately - so they remain intact and accessible during the update process. This method helps you maintain your customizations while ensuring your theme stays up-to-date and fully operational.
How can I quickly spot custom code I added before?
To spot custom code quickly, use the Shopify code editor to compare theme files and identify changes made before updates. Always duplicate your theme before making edits to ensure you have a backup. Additionally, reviewing community discussions or referring to saved notes about previous modifications can help you keep track of customizations.
