
Getting your Amazon seller account suspended can feel overwhelming, but reinstating it is possible with the right approach. Here's what you need to know:
- Understand the Suspension Notice: Check your Performance Notifications in Seller Central to confirm the issue and avoid phishing scams.
- Identify the Root Cause: Analyze your performance metrics (e.g., Order Defect Rate, Late Shipment Rate) and review past warnings to pinpoint the problem.
- Gather Evidence: Collect documents like supplier invoices, Letters of Authorization, and shipping logs to support your appeal.
- Write a Clear Plan of Action (POA): Address the root cause, outline immediate fixes, and detail long-term preventive measures. Keep it professional and specific.
- Submit Your Appeal: Use Seller Central to upload your POA and supporting documents. Be patient but prepared to revise and resubmit if denied.
The key to success is showing Amazon that you’ve resolved the issue and implemented measures to prevent it from happening again. Follow these steps to improve your chances of reinstatement.
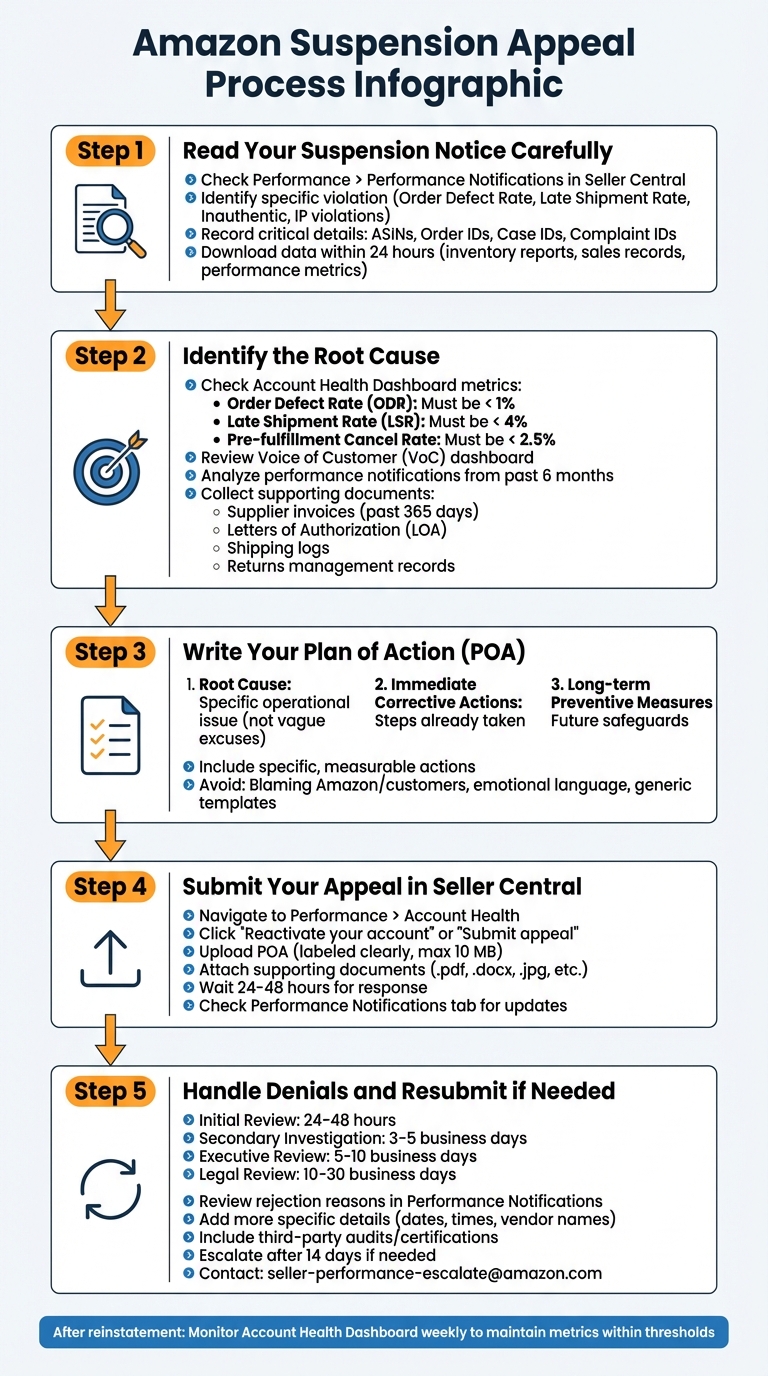
5-Step Amazon Suspension Appeal Process Guide
Amazon Suspension Appeal Templates & Tips | Reactivate your Amazon account
sbb-itb-81460ea
Step 1: Read Your Suspension Notice Carefully
When you receive a suspension notice, the first step is to confirm it’s legitimate. Head over to Performance > Performance Notifications in Seller Central. This is Amazon’s official channel for all communications. By checking here first, you can avoid falling victim to phishing scams that mimic Amazon’s emails [11][12]. Genuine suspension notices often use the subject line: "Your Amazon.com Seller Account" [12].
Identify the Specific Violation
Your suspension notice will include key phrases that point to the issue. For performance-related suspensions, you might see terms like "Order Defect Rate", "Late Shipment Rate", or "Cancellation Rate" [10][6]. Policy violations, on the other hand, often mention words like "Inauthentic", "Intellectual Property", "Manipulation", or "Restricted Products" [7][6]. If the issue is related to product condition, you might encounter "Used Sold as New." Broader platform integrity concerns are sometimes flagged under "Section 3" [7][5].
"Amazon's language can be vague, but there are always clues. Are they pointing to a policy violation, a performance issue, or an IP complaint? That email gives you the thread you need to start unraveling the real problem." - Chilat Doina [6]
Your notice will also specify what Amazon needs from you. This could include invoices from the last year, Letters of Authorization, or supply chain documentation [11][6]. Use the exact terms from the notice to cross-reference Amazon’s Seller Central help pages and pinpoint the violated policy [5].
Once you’ve identified the issue, start gathering the necessary data to build your appeal.
Gather All Required Information
The suspension notice will include critical details like ASINs, Order IDs, Case IDs, or Complaint IDs. Make sure to record these - they’re essential for addressing the issue correctly [7][12][5].
Act quickly. Within the first 24 hours, download your inventory reports, sales records, payment summaries, and performance metrics. As the suspension progresses, your access to this data may become restricted [6]. If the suspension involves "inauthentic" claims but the notice lacks specifics, check your Voice of the Customer (VoC) dashboard. Look for high Negative Customer Experience rates or buyer complaints [6]. Also, review your Performance Notifications from the past six months. Amazon often issues warnings about specific ASINs before escalating to a full account suspension [6].
"Amazon doesn't wait for evidence to act. It suspends based on risk perception – and then asks you to prove why you're no longer a risk." - Or Shamosh, ASA Compliance Group [7]
Once you’ve collected this information, focus on identifying the root cause of the issue. This will be the foundation of your appeal.
Step 2: Identify the Root Cause
Once you've gathered all the necessary information, the next step is figuring out why the problem happened in the first place. Avoid vague explanations or excuses - Amazon wants to see that you understand the specific operational issue behind the problem. For instance, if your account was suspended due to late shipments, don’t just say, "We shipped late." Instead, pinpoint the root cause, like a warehouse software glitch, a mistake by a new supplier, or delays at your fulfillment center [2].
Check Your Performance Metrics
Start by examining your Account Health Dashboard in Seller Central. This tool gives you an overview of critical performance metrics and shows if your account is below Amazon's standards. Keep an eye on these thresholds:
- Order Defect Rate (ODR): Less than 1%
- Late Shipment Rate (LSR): Less than 4%
- Pre-fulfillment Cancel Rate: Less than 2.5% [4]
If your suspension is tied to performance issues, dig deeper into the orders that caused the violation. Look at A-to-z Guarantee claims, negative feedback, and chargebacks to identify patterns or specific problem areas. Additionally, check your VoC (Voice of the Customer) dashboard for customer feedback and review performance notifications from the past six months for early warning signs [6].
"Amazon doesn't just suspend accounts out of the blue. There's always a data trail leading up to the final decision."
- Chilat Doina, Million Dollar Sellers
These insights will help you build a data-driven case for your appeal.
Collect Supporting Documents
A strong appeal needs solid evidence to back it up. Gather the following documentation:
- Supplier Invoices: Provide itemized invoices from the past 365 days. These should include full supplier contact details and quantities that align with your sales volume [5].
- Letters of Authorization (LOA): If you're facing an inauthentic claim, secure LOAs from brand owners to prove you're an authorized reseller.
- Shipping Logs: For late shipment suspensions, include carrier scan times and delivery confirmations as proof [5].
- Returns Management Records: If the issue involves complaints about product condition, review your returns process to ensure defective items weren’t accidentally returned as "New" inventory [6].
Amazon’s Seller Performance team expects precise, fact-based documentation, so make sure your evidence is detailed and directly addresses the issue. This level of preparation shows that you're serious about resolving the problem.
Step 3: Write Your Plan of Action (POA)
Once you've reviewed your violation and gathered evidence, it's time to craft a clear Plan of Action (POA). Use the root cause and supporting documents from Step 2 to guide your approach. Your POA is the backbone of your appeal. Amazon's Seller Performance team handles countless appeals weekly, so your document needs to stand out as professional and well-structured. As CJ Rosenbaum, Founder of Amazon Sellers Lawyer, explains:
"Amazon's Seller Performance team requires clear, structured, factual explanations that outline what went wrong, how you've fixed the issue, and what steps you're taking to prevent future problems" [10].
Organize Your POA Into Three Parts
Divide your POA into three clear sections to address Amazon's key concerns.
- Root Cause: Pinpoint the exact issue that led to the violation. Be specific. Instead of saying "shipping was late", clarify that "a manager was not assigned to oversee fulfillment tools" [1][3].
- Immediate Corrective Actions: Highlight the steps you've already taken to resolve the issue. Examples include removing faulty inventory, issuing refunds, or ending partnerships with unreliable suppliers.
- Long-term Preventive Measures: Detail the changes you're implementing to prevent future problems. For instance, you could describe a "3-step supplier vetting process" or "monthly compliance audits" [15][17].
This structure ensures your appeal is clear and easy to follow, helping Amazon investigators quickly understand the issue, the resolution, and how you plan to prevent it from happening again [14][16].
Include Specific Actions You Will Take
Your POA should outline measurable, actionable steps. For example, if you're addressing quality control issues, you might state that you're "adding barcode scanning to validate product condition before shipping to FBA" or "conducting staff training sessions on Amazon's Intellectual Property policies and packaging standards" [15][17]. If late shipments were the problem, explain how you're "upgrading inventory management systems to include real-time monitoring and automated low-stock alerts" [17]. These details show you've carefully planned changes to rebuild buyer trust.
Avoid These Common Errors
Steer clear of blaming Amazon, customers, or third-party fulfillment centers in your POA [15][14]. Refrain from using emotional language, making defensive remarks, or issuing legal threats, as these can lead to your appeal being ignored or escalated [7]. Avoid using generic templates or AI-generated responses. Instead, keep your POA concise and focused. As Matt Juul from Feedvisor puts it:
"A plan of action is not meant to be a lengthy essay that covers every aspect of your business. Instead, it should be direct and factual" [13].
Stick to relevant details, and ensure that every root cause you mention is matched with a corresponding corrective action and preventive measure [3].
Step 4: Submit Your Appeal in Seller Central
Once your Plan of Action (POA) is ready, the next step is submitting your appeal through Seller Central. While the process itself is simple, paying close attention to the details can make a big difference in avoiding unnecessary delays.
Navigate to the Appeal Form
Start by logging into Seller Central. From there, go to Performance > Account Health [18]. If your account is deactivated, you’ll see a "Reactivate your account" option at the top of the page [18]. For individual listing suspensions, look for violations marked with a red exclamation point and click "Submit appeal" next to the specific issue [19]. If you need direct assistance, use the "Call Me Now" button to connect with an Account Health specialist, if available [19].
Attach Your POA and Supporting Documents
Upload your POA, ensuring it’s clearly labeled (e.g., "POA – [Violation Name] – [Date]") [20]. Accepted file formats include .jpg, .tiff, .pdf, .docx, .txt, .xlsx, .csv, and .eml, with a size limit of 10 MB per file [12]. Along with your POA, include any required supporting documents. These might include:
- Unaltered invoices from authorized suppliers (dated within the past 365 days)
- Business licenses
- Tax documents
- Government-issued ID
- Utility bills
- Safety Data Sheets
Make sure all identification documents are up-to-date and match the name and address listed in your Seller Central profile [14]. To make your invoices easier to review, use visual aids like circles or arrows to highlight key information such as supplier details [13].
"Amazon respects clarity and structure. Your letter should be easy to scan, with headers, bolded keywords, and clear separation between root cause, corrections, and preventative measures." - Or Shamosh, ASA Compliance Group [7]
Avoid submitting your POA through multiple channels, as this can lead to automatic rejections [12]. Once your documents are uploaded, your appeal enters Amazon’s review queue.
Wait for Amazon's Reply
Amazon generally responds within 24 to 48 hours [18]. Keep an eye on the Performance Notifications tab and your primary administrator’s email inbox (don’t forget to check the spam folder) for updates [12][18]. Resist the urge to send repeat appeals, as this can reset the review process or even flag your appeal as spam [12].
"Patience is best and prevents your POA from being rejected." - Commerce Rev [12]
If you don’t hear back within 5 to 7 business days, follow up through the Case Log or by using the original Appeal button [8].
Step 5: Handle Denials and Resubmit if Needed
Submitting your appeal is just one step in the process. If Amazon denies your appeal, don’t lose hope - this is often part of the journey. Amazon frequently sends automated or templated rejections, sometimes asking for "greater detail" in specific sections of your Plan of Action (POA) [12].
Review Amazon's Rejection Reasons
Start by checking the Performance Notifications tab in Seller Central. This is where you’ll find Amazon’s feedback on why your appeal was denied [10][12]. If the rejection seems immediate and generic, it’s likely an automated response [23].
To improve your chances, revise your POA with precise details - such as specific dates, times, and vendor names [4]. If your root cause analysis feels too surface-level, dig deeper to identify the real operational issue instead of just addressing symptoms [7][21]. Strengthen your case by including third-party audit documents, certifications, or GS1-verified invoices [21][22]. If you’ve faced multiple rejections without clear feedback, use the "Call Me Now" button to speak with an Account Health specialist who can provide verbal guidance on improving your appeal [12][22].
"Even if you receive a message from Amazon that claims they may not read or respond to any additional POA submissions, continue submitting." - Abigail Lee, Content Specialist, Commerce Rev [12]
If rejections persist, it might be time to escalate your case. But timing and preparation are key.
Escalation Timeline
Understanding Amazon’s review process can help you set realistic expectations. Here’s an outline of the typical escalation stages and response times:
| Escalation Stage | Expected Response Timeframe |
|---|---|
| Initial Seller Performance Review | 24–48 hours (often automated) [21] |
| Secondary Investigation | 3–5 business days [21] |
| Executive Seller Relations Review | 5–10 business days [21] |
| Legal Department Review | 10–30 business days [21] |
Escalate When Appropriate
Escalating means having senior teams, like Executive Seller Relations, review your case [24]. However, escalation should only happen after you’ve refined your POA based on feedback. Rushing to escalate with a weak appeal could result in a "Final Word" annotation, which halts future correspondence from Amazon [24][25].
Consider escalation if:
- You haven’t received a meaningful response after 14 days.
- You continue to get vague, templated denials despite providing all requested information [21].
When escalating, include two key components: a concise escalation letter and your revised POA. In the letter’s opening paragraph, highlight two or three major actions you’ve taken to demonstrate the strength of your appeal [24]. Request that a "senior investigator" or "Seller Performance manager" review your case [24][25]. You can contact the Executive Seller Relations team or email seller-performance-escalate@amazon.com [21].
"Escalating your appeal will only work IF you do it at the right time, with a solid Plan of Action (POA) behind you." - Chris McCabe, Owner and Founder, ecommerceChris, LLC [24]
Avoid emotional arguments about lost revenue - they’re unlikely to sway investigators and may even cause them to stop reading [25]. If internal channels fail, consider filing a complaint with the Better Business Bureau or pursuing binding arbitration under BSA §18 [21][23]. For example, in mid-2024, a private label seller suspended for "inauthentic" complaints faced multiple automated rejections. After restructuring their POA with corrected invoices and escalating through a BBB filing, the case was assigned to a human investigator, and the account was reinstated within two weeks [23].
Keep Monitoring Your Account Health
Once your account is reinstated, staying proactive is critical. Implement measures like a pre-publish gate requiring compliance sign-offs for all listing edits before they go live [22]. Schedule quarterly audits of your supply chain, re-verifying supplier Letters of Authorization (LOAs) and invoices to ensure they meet Amazon’s freshness requirements (90–365 days) [22].
Keep your performance metrics within Amazon’s thresholds:
- Order Defect Rate (ODR): Below 1%
- Late Shipment Rate (LSR): Below 4%
- Pre-fulfillment Cancel Rate: Under 2.5% [9][10][12]
Check your Account Health dashboard weekly to spot and address potential issues before they escalate into suspensions.
"Strong appeals are operational, not emotional. The goal is to show a reviewer that you understand the failure, have already fixed it, and have controls to prevent it from recurring." - Online Seller Solutions [22]
Conclusion
To successfully appeal an Amazon suspension, focus on accountability, precision, and evidence of operational improvements. Amazon isn't concerned with past mistakes - it wants assurance that the same problems won’t happen again. Your appeal should clearly show that you understand the issue, have already corrected it, and have implemented systems to prevent future occurrences.
Start by reviewing the violation details in your suspension notice. Use tools like your Account Health Dashboard and performance metrics to conduct a thorough root cause analysis. Your Plan of Action (POA) should address three key elements: the root cause, immediate corrective actions, and long-term preventive measures. Support your claims with relevant documentation, such as invoices, letters of authorization, or updated standard operating procedures (SOPs). This approach ties together the actionable steps discussed earlier.
Steer clear of mistakes that lead to automatic rejection. Avoid using generic templates or AI-generated appeals - Amazon’s Seller Performance team can identify and dismiss these quickly. Maintain a professional, solution-focused tone. Rather than blaming customers, making excuses, or discussing lost revenue, provide specific data, dates, and ASIN-level examples to clearly outline your plan.
If your initial appeal is rejected, take the feedback seriously. Revise your POA with more detail and resubmit it. Only escalate to Executive Seller Relations after strengthening your case and waiting the required 14 days for a response. Once reinstated, prioritize monitoring your key performance metrics and regularly check your Account Health Dashboard to catch potential issues early.
"Amazon is not looking for perfection. They're looking for transparency, change, and proof that working with you again is low-risk." - Or Shamosh, CEO, ASA Compliance Group [7]
FAQs
What can I do if Amazon rejects my first appeal?
If Amazon rejects your initial appeal, it’s time to regroup and analyze their response carefully. Pay close attention to the reasons for the denial and ensure your Plan of Action (POA) directly addresses those concerns with clear, practical steps to prevent the same issues from happening again.
To make your case stronger, include supporting documentation like invoices, purchase records, or relevant correspondence. Update your POA to reflect accountability, operational improvements, and specific preventive measures. Keep your appeal concise but thorough, focusing on resolving the exact concerns Amazon raised.
If your revised appeal doesn’t succeed, you might need to escalate the issue through Amazon’s escalation channels or consult a professional for guidance. A combination of persistence, clarity, and a well-structured approach can increase your chances of getting reinstated.
How can I avoid future suspensions after my Amazon account is reinstated?
To minimize the risk of future suspensions, start by pinpointing the exact issue that triggered your suspension and addressing it completely. Carefully review Amazon’s policies to ensure your business operations align with their standards. Focus on maintaining strong performance metrics, keeping product listings accurate and compliant, and consistently delivering top-notch customer service.
Creating a solid Plan of Action (POA) can also make a big difference. This should detail the root cause of the problem, the corrective measures you've implemented, and the steps you’ll take to prevent similar issues in the future. Stay on top of Amazon’s policy updates, take a proactive approach to compliance, and put systems in place to identify and resolve potential problems early. By remaining diligent and committed to meeting Amazon’s expectations, you’ll greatly reduce the chances of facing another suspension.
What mistakes should I avoid when writing a Plan of Action for an Amazon suspension?
When putting together a Plan of Action (POA) to appeal an Amazon suspension, it’s important to take your time and avoid submitting a rushed or poorly thought-out response. A vague, incomplete, or overly emotional POA can hurt your chances of reinstatement. Instead, aim for a response that is clear, professional, and to the point.
Your POA should include three key components: a detailed root cause analysis, specific corrective actions, and preventative steps to ensure the issue doesn’t happen again. Steer clear of generic explanations or irrelevant details that don’t directly address the reason for the suspension. Amazon values responses that are concise, well-organized, and show both accountability and a commitment to improvement.
